2-Ingredient Coconut Chocolate Bars: Easy No-Bake Bounty at Home
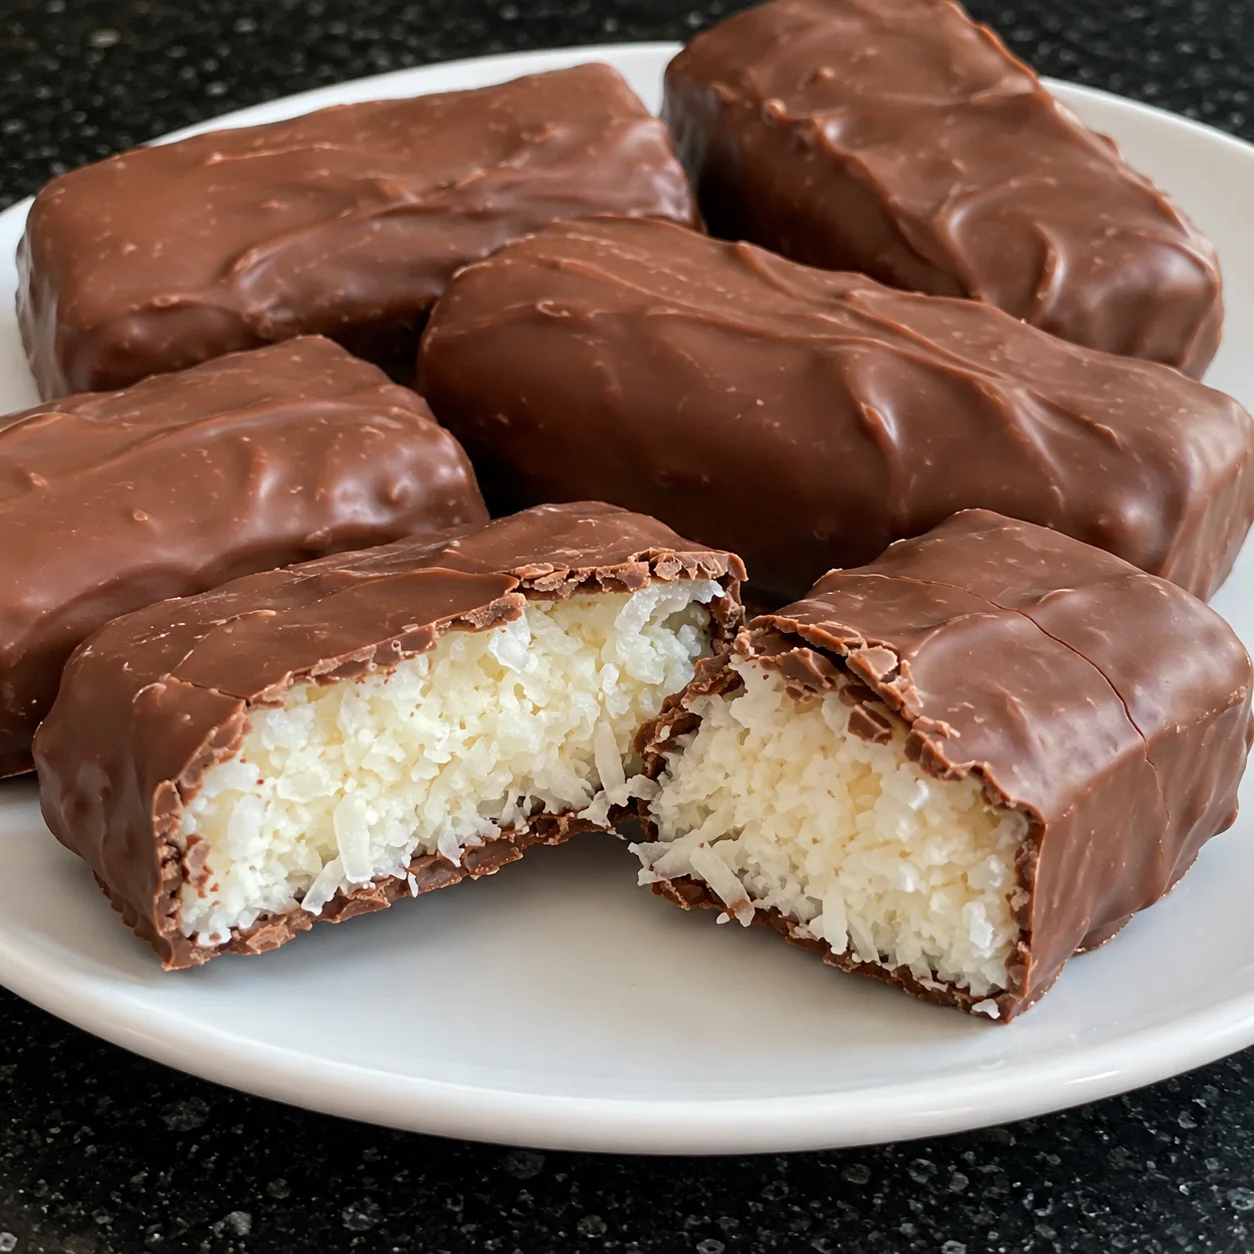
Love the combination of creamy coconut and rich chocolate? These 2-Ingredient Coconut Chocolate Bars are an easy homemade treat inspired by classic Bounty candy bars. Made with shredded coconut and sweetened condensed milk for the filling, then dipped in melted chocolate, they have a soft, sweet coconut center covered in a delicious chocolate shell.
The best part? You don’t need an oven, complicated equipment, or special baking skills. Simply mix the coconut filling, shape it into bars, chill until firm, and coat each piece in melted chocolate.
Whether you’re preparing a dessert for a party, satisfying a chocolate craving, or looking for an easy homemade sweet, these no-bake Bounty bars are a delicious choice. The coconut filling requires just two ingredients, making this recipe simple enough for beginners and perfect for preparing ahead of time.
Why You’ll Love These Homemade Bounty Bars
These no-bake coconut chocolate bars are easy to make and taste delicious straight from the refrigerator.
- No baking required: Prepare these chocolate treats without turning on the oven.
- Simple coconut filling: Shredded coconut and sweetened condensed milk create a soft, sweet center.
- Rich chocolate coating: Milk or dark chocolate adds a delicious outer shell.
- Easy to prepare: Mix, shape, chill, dip, and refrigerate.
- Perfect for sharing: Serve them at parties, family gatherings, or holiday celebrations.
- Make-ahead friendly: Prepare them in advance and keep them chilled until serving.
Ingredients for 2-Ingredient Coconut Chocolate Bars
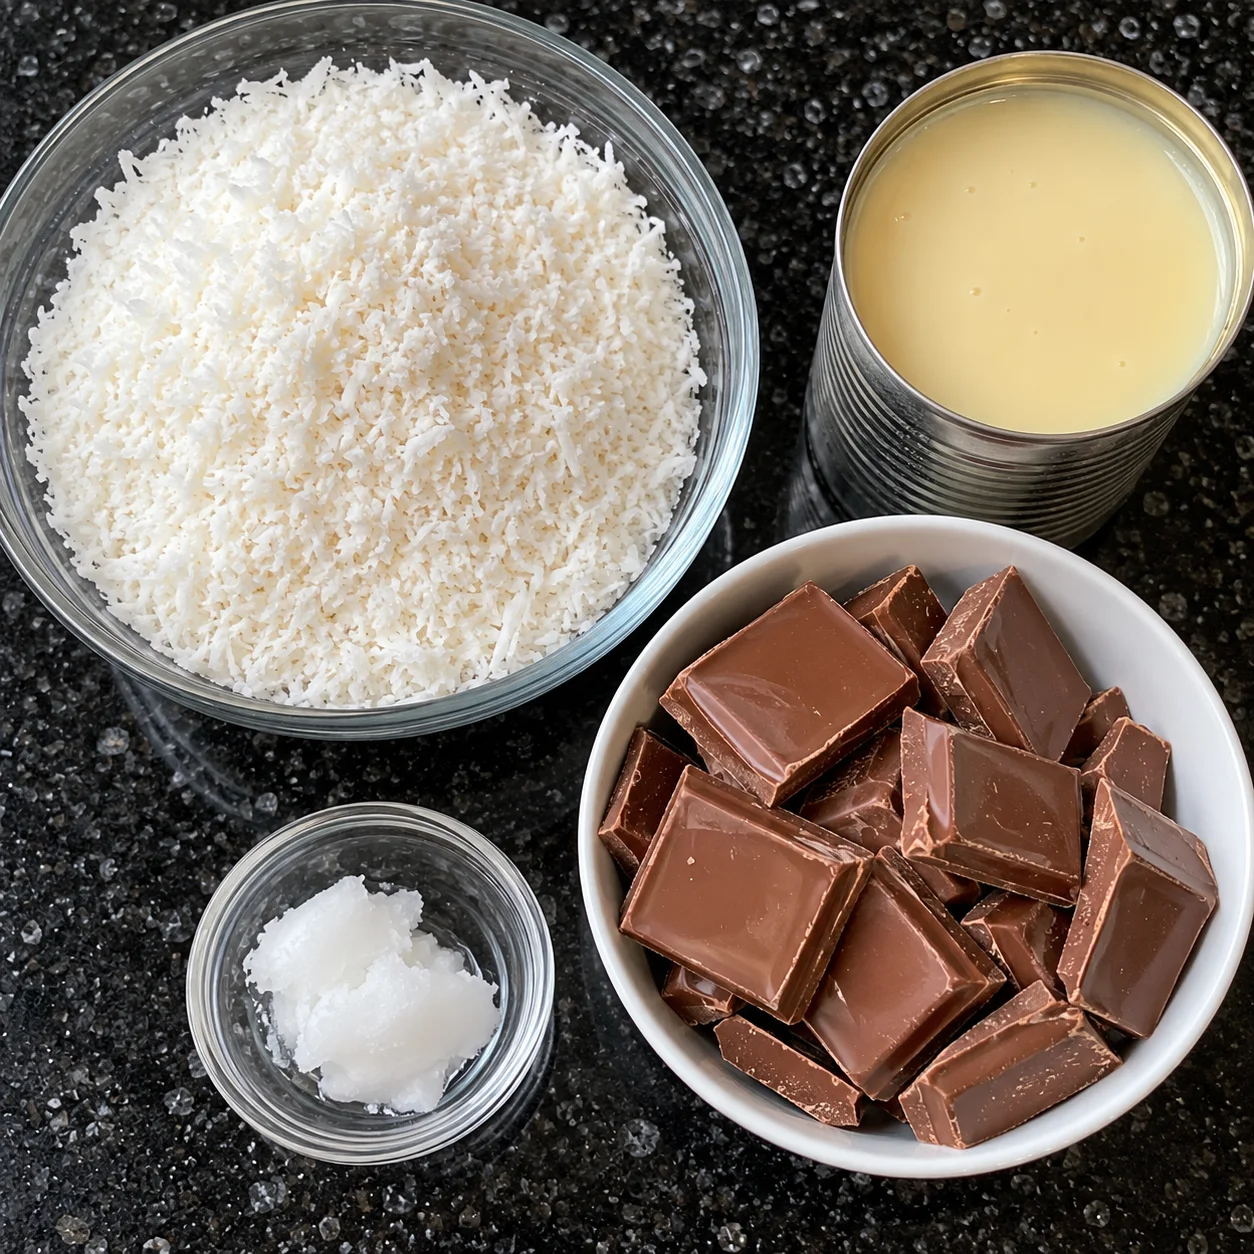
This recipe makes approximately 12 coconut chocolate bars, depending on their size.
- Shredded coconut: 2 1/2 cups (200 g). Use shredded or desiccated coconut to create the sweet coconut filling.
- Sweetened condensed milk: 1 can (397 g / 14 oz). This binds the coconut together and gives the filling its soft, sweet texture.
- Milk chocolate or dark chocolate: 200 g. Choose your favorite chocolate for the outer coating.
- Coconut oil or vegetable oil: 1 teaspoon. This helps the melted chocolate become smoother and easier to use for dipping.
Note: The coconut filling uses only two ingredients. Chocolate and oil are additional ingredients for the coating, so the complete recipe contains four ingredients.
Choosing the Best Ingredients
Shredded coconut: Unsweetened shredded coconut works well because the condensed milk already adds sweetness. Desiccated coconut can also be used, although its finer texture may affect how much condensed milk you need.
Sweetened condensed milk: Make sure you use sweetened condensed milk, not evaporated milk. Condensed milk is thick and sweet, which helps the coconut mixture hold its shape.
Chocolate: Milk chocolate gives the bars a sweeter flavor, while dark chocolate creates a richer contrast with the coconut filling.
Coconut oil: A small amount helps the chocolate melt smoothly and makes dipping easier. Vegetable oil is a suitable alternative.
How to Make 2-Ingredient Coconut Chocolate Bars
Follow these simple steps to make homemade Bounty-style bars without baking.
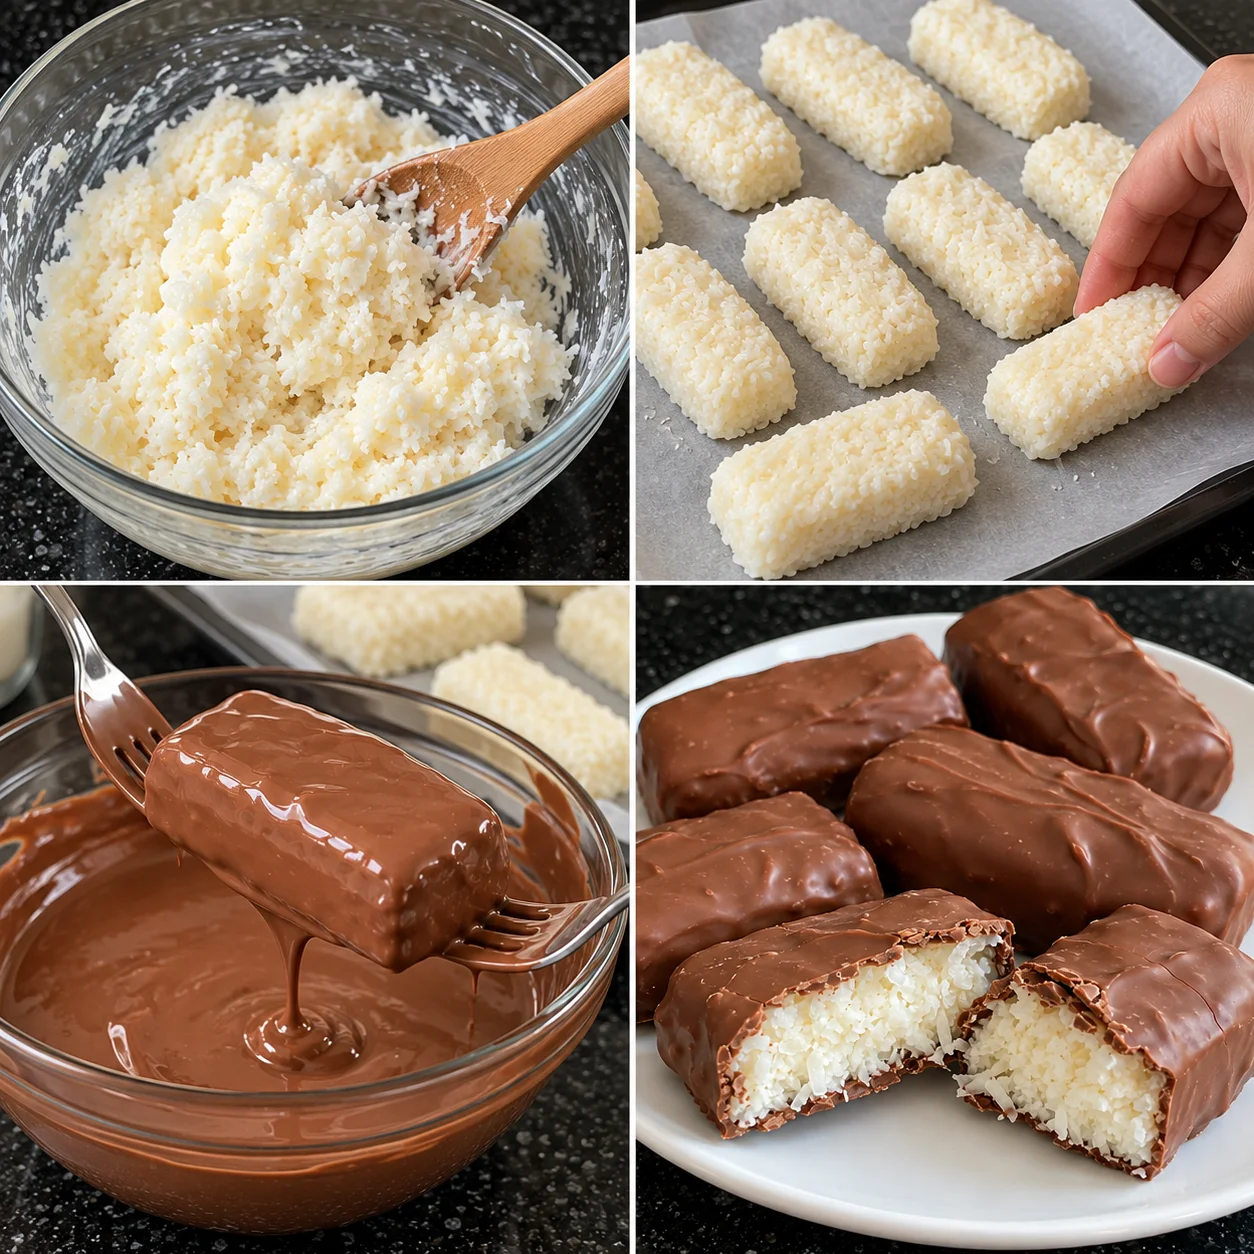
Step 1: Mix the Coconut Filling
Add the shredded coconut to a large mixing bowl. Pour in the sweetened condensed milk and stir with a wooden spoon until everything is evenly combined.
Continue mixing until the coconut is fully coated and the mixture becomes sticky enough to hold its shape when pressed together.
If the mixture feels too wet, add a little more shredded coconut. If it seems too dry to shape, mix in a small amount of condensed milk.
Step 2: Shape the Coconut Bars
Take a small portion of the coconut mixture and shape it between your hands into a rectangular bar approximately 5–6 cm long.
Press the mixture firmly enough to help it hold together, then smooth the edges with your fingers.
Place each bar on a baking tray lined with parchment paper. Repeat until you’ve used all the mixture, aiming for approximately 12 evenly sized bars.
Try to make the bars similar in size and thickness so they chill evenly and are easier to coat.
Step 3: Chill Until Firm
Place the tray in the freezer for approximately 15 minutes or in the refrigerator for around 30 minutes.
Chilling helps the coconut filling firm up, making the bars easier to handle and dip into melted chocolate without breaking apart.
If the mixture feels soft or sticky, give it a little more time in the refrigerator before continuing.
Step 4: Melt the Chocolate
Break the chocolate into small pieces and place them in a microwave-safe bowl. Add the coconut oil or vegetable oil.
Microwave in 30-second intervals, stirring after each interval until the chocolate is completely melted and smooth.
Alternatively, melt the chocolate in a heatproof bowl over a saucepan of gently simmering water. Make sure the bottom of the bowl doesn’t touch the water, and avoid letting water enter the chocolate.
Stir until the mixture is glossy and fluid enough for dipping.
Step 5: Coat the Coconut Bars
Remove the chilled coconut bars from the refrigerator or freezer.
Using two forks, carefully dip each bar into the melted chocolate. Turn it gently until every side is covered, then lift it out and allow the excess chocolate to drip back into the bowl.
Place each coated bar back on the parchment-lined tray.
If the chocolate starts becoming too thick while you’re working, warm it briefly and stir until smooth again.
Step 6: Chill Until the Chocolate Sets
Place the coated coconut bars in the refrigerator for approximately 20 minutes, or until the chocolate coating is completely firm.
Once the chocolate has set, carefully remove the bars from the parchment paper.
Your homemade Bounty-style coconut chocolate bars are ready to enjoy! Each bite combines a sweet, creamy coconut center with a rich chocolate shell.
Tips for Perfect Homemade Bounty Bars
A few simple tips can help you achieve the best texture and appearance.
- Use the right coconut: Shredded and desiccated coconut can differ in size and moisture. Adjust the condensed milk gradually if necessary.
- Press the filling firmly: Compact bars are less likely to crumble when dipped into chocolate.
- Chill before dipping: Cold coconut bars hold their shape better and are easier to coat.
- Melt chocolate slowly: Short microwave intervals help prevent the chocolate from overheating or burning.
- Use forks for dipping: Two forks make it easier to turn each bar and drain excess chocolate.
- Allow enough setting time: Refrigerate the bars until the chocolate shell is firm before serving.
For a neater finish, gently tap the dipping fork against the edge of the bowl to remove excess chocolate before placing each bar on the parchment paper.
Easy Variations to Try
One of the best things about homemade coconut chocolate bars is how easy they are to customize.
Dark Chocolate Coconut Bars: Use dark chocolate instead of milk chocolate for a richer, less sweet coating.
Milk Chocolate Bounty Bars: Choose milk chocolate for a sweeter flavor that pairs beautifully with coconut.
Mini Coconut Chocolate Bites: Shape the mixture into small balls instead of rectangular bars for bite-sized treats. If you love easy coconut desserts, try these 3-Ingredient Chocolate Coconut Balls: Easy No-Bake Treat.
Almond Coconut Chocolate Bars: Press a whole roasted almond into the center of each bar before shaping the filling around it.
Vanilla Coconut Bars: Add a small amount of vanilla extract to the coconut mixture for extra aroma. Use it sparingly to avoid making the filling too soft.
Extra-Coconut Coating: Sprinkle a little shredded coconut over the chocolate before it sets for a decorative finish and extra coconut flavor.
How to Store Coconut Chocolate Bars
Because these homemade bars contain sweetened condensed milk, proper storage is important to maintain their texture and freshness.
- Refrigerator: Place the bars in an airtight container and refrigerate for approximately 5–7 days for best quality.
- Freezer: Freeze the bars in a freezer-safe container, separating layers with parchment paper. For best quality, enjoy them within about 2 months.
- Serving: Enjoy them straight from the refrigerator or let them sit at room temperature briefly for a softer coconut center.
Avoid leaving the bars at room temperature for extended periods, especially in warm weather, because the chocolate coating can soften and the filling contains dairy.
Frequently Asked Questions
Can I Make Coconut Chocolate Bars Without Baking?
Yes! These homemade Bounty-style bars are completely no-bake. Simply mix the coconut with condensed milk, shape the filling, chill, dip in melted chocolate, and refrigerate until set.
Why Is My Coconut Filling Too Sticky?
Your coconut may be absorbing less liquid than expected. Add a little more shredded coconut, mix well, and chill the mixture before shaping. Avoid adding too much coconut at once, as this can make the filling dry and crumbly.
Can I Use Desiccated Coconut Instead of Shredded Coconut?
Yes. Desiccated coconut works well in this recipe. Since it can be finer and drier than some shredded coconut varieties, you may need to adjust the amount of condensed milk slightly to achieve a firm, moldable filling.
Can I Use White Chocolate Instead of Milk Chocolate?
Absolutely! White chocolate creates a sweeter coating that pairs well with coconut. Melt it gently, as white chocolate can be more sensitive to heat than regular milk or dark chocolate.
Do I Need to Freeze the Coconut Bars Before Dipping?
Freezing isn’t essential, but chilling is strongly recommended. Fifteen minutes in the freezer or around 30 minutes in the refrigerator usually helps the bars become firm enough to dip without breaking.
Can I Make These Homemade Bounty Bars Ahead of Time?
Yes. You can prepare the bars ahead of time and keep them refrigerated in an airtight container until you’re ready to serve. They’re an excellent make-ahead dessert for parties and special occasions.
Make These Easy No-Bake Coconut Chocolate Bars Today
These 2-Ingredient Coconut Chocolate Bars are proof that you don’t need an oven or complicated ingredients to make a delicious homemade treat. With shredded coconut and sweetened condensed milk forming the filling, plus a smooth chocolate coating, every bar delivers the perfect combination of creamy coconut and rich chocolate.
They’re simple enough for everyday cravings but delicious enough to share at parties, holidays, and family gatherings.
Gather your ingredients, shape the coconut filling, and dip each bar into melted chocolate for an easy homemade dessert inspired by classic Bounty candy bars.
If you love homemade chocolate desserts, don’t miss our 3-Ingredient Chocolate Brigadeiros: Easy No-Bake Chocolate Truffles for another delicious no-bake treat to enjoy at home.
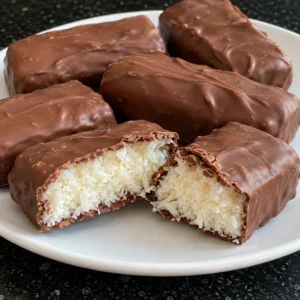
2-Ingredient Coconut Chocolate Bars: Easy No-Bake Bounty at Home
Ingredients
- 2 ½ cups 200 g shredded coconut
- 1 can 397 g / 14 oz sweetened condensed milk
- 200 g milk chocolate or dark chocolate
- 1 teaspoon coconut oil or vegetable oil
Instructions
- Mix the coconut filling: Combine the shredded coconut and sweetened condensed milk in a large bowl. Stir until evenly mixed and sticky enough to hold its shape.
- Shape the bars: Form the mixture into approximately 12 rectangular bars, about 5–6 cm long. Press firmly and place on a parchment-lined tray.
- Chill until firm: Freeze for approximately 15 minutes or refrigerate for around 30 minutes.
- Melt the chocolate: Break the chocolate into pieces and combine with the coconut oil. Microwave in 30-second intervals, stirring until smooth, or melt gently over a double boiler.
- Dip the bars: Coat each chilled coconut bar completely in melted chocolate using two forks. Let excess chocolate drip back into the bowl.
- Set the chocolate: Return the coated bars to the parchment-lined tray and refrigerate for approximately 20 minutes, until the chocolate is firm.
- Serve: Enjoy the homemade Bounty-style coconut chocolate bars chilled.
Notes
-
Use unsweetened shredded coconut to balance the sweetness of the condensed milk.
-
Add extra coconut if the filling is too wet, or a small amount of condensed milk if it is too dry.
-
Chill the bars thoroughly before dipping to prevent them from breaking apart.
-
Use milk chocolate for a sweeter coating or dark chocolate for a richer flavor.
-
Store in an airtight container in the refrigerator for approximately 5–7 days for best quality.
-
Freeze for up to approximately 2 months for best quality.
-
The coconut filling uses only two ingredients; the complete recipe includes four ingredients.
-
For variations, try white chocolate, mini coconut bites, or an almond pressed into the center of each bar.